How to measure sound levels
- Click “Start measuring” and allow microphone access. The meter turns off the microphone’s automatic gain and noise suppression, which would otherwise falsify the reading.
- Point the microphone at the sound, roughly where a listener’s ears would be. On a phone, the main mic is on the bottom edge. Don’t cover it with your fingers.
- Measure for at least 30 seconds. Sounds fluctuate, so read the Average (Leq) rather than a single moment. Max shows the loudest peak.
- Compare against the reference scale. The marker shows where the current level sits between a whisper and a rock concert. Above 85 dB, the meter tells you how long you can safely stay exposed.
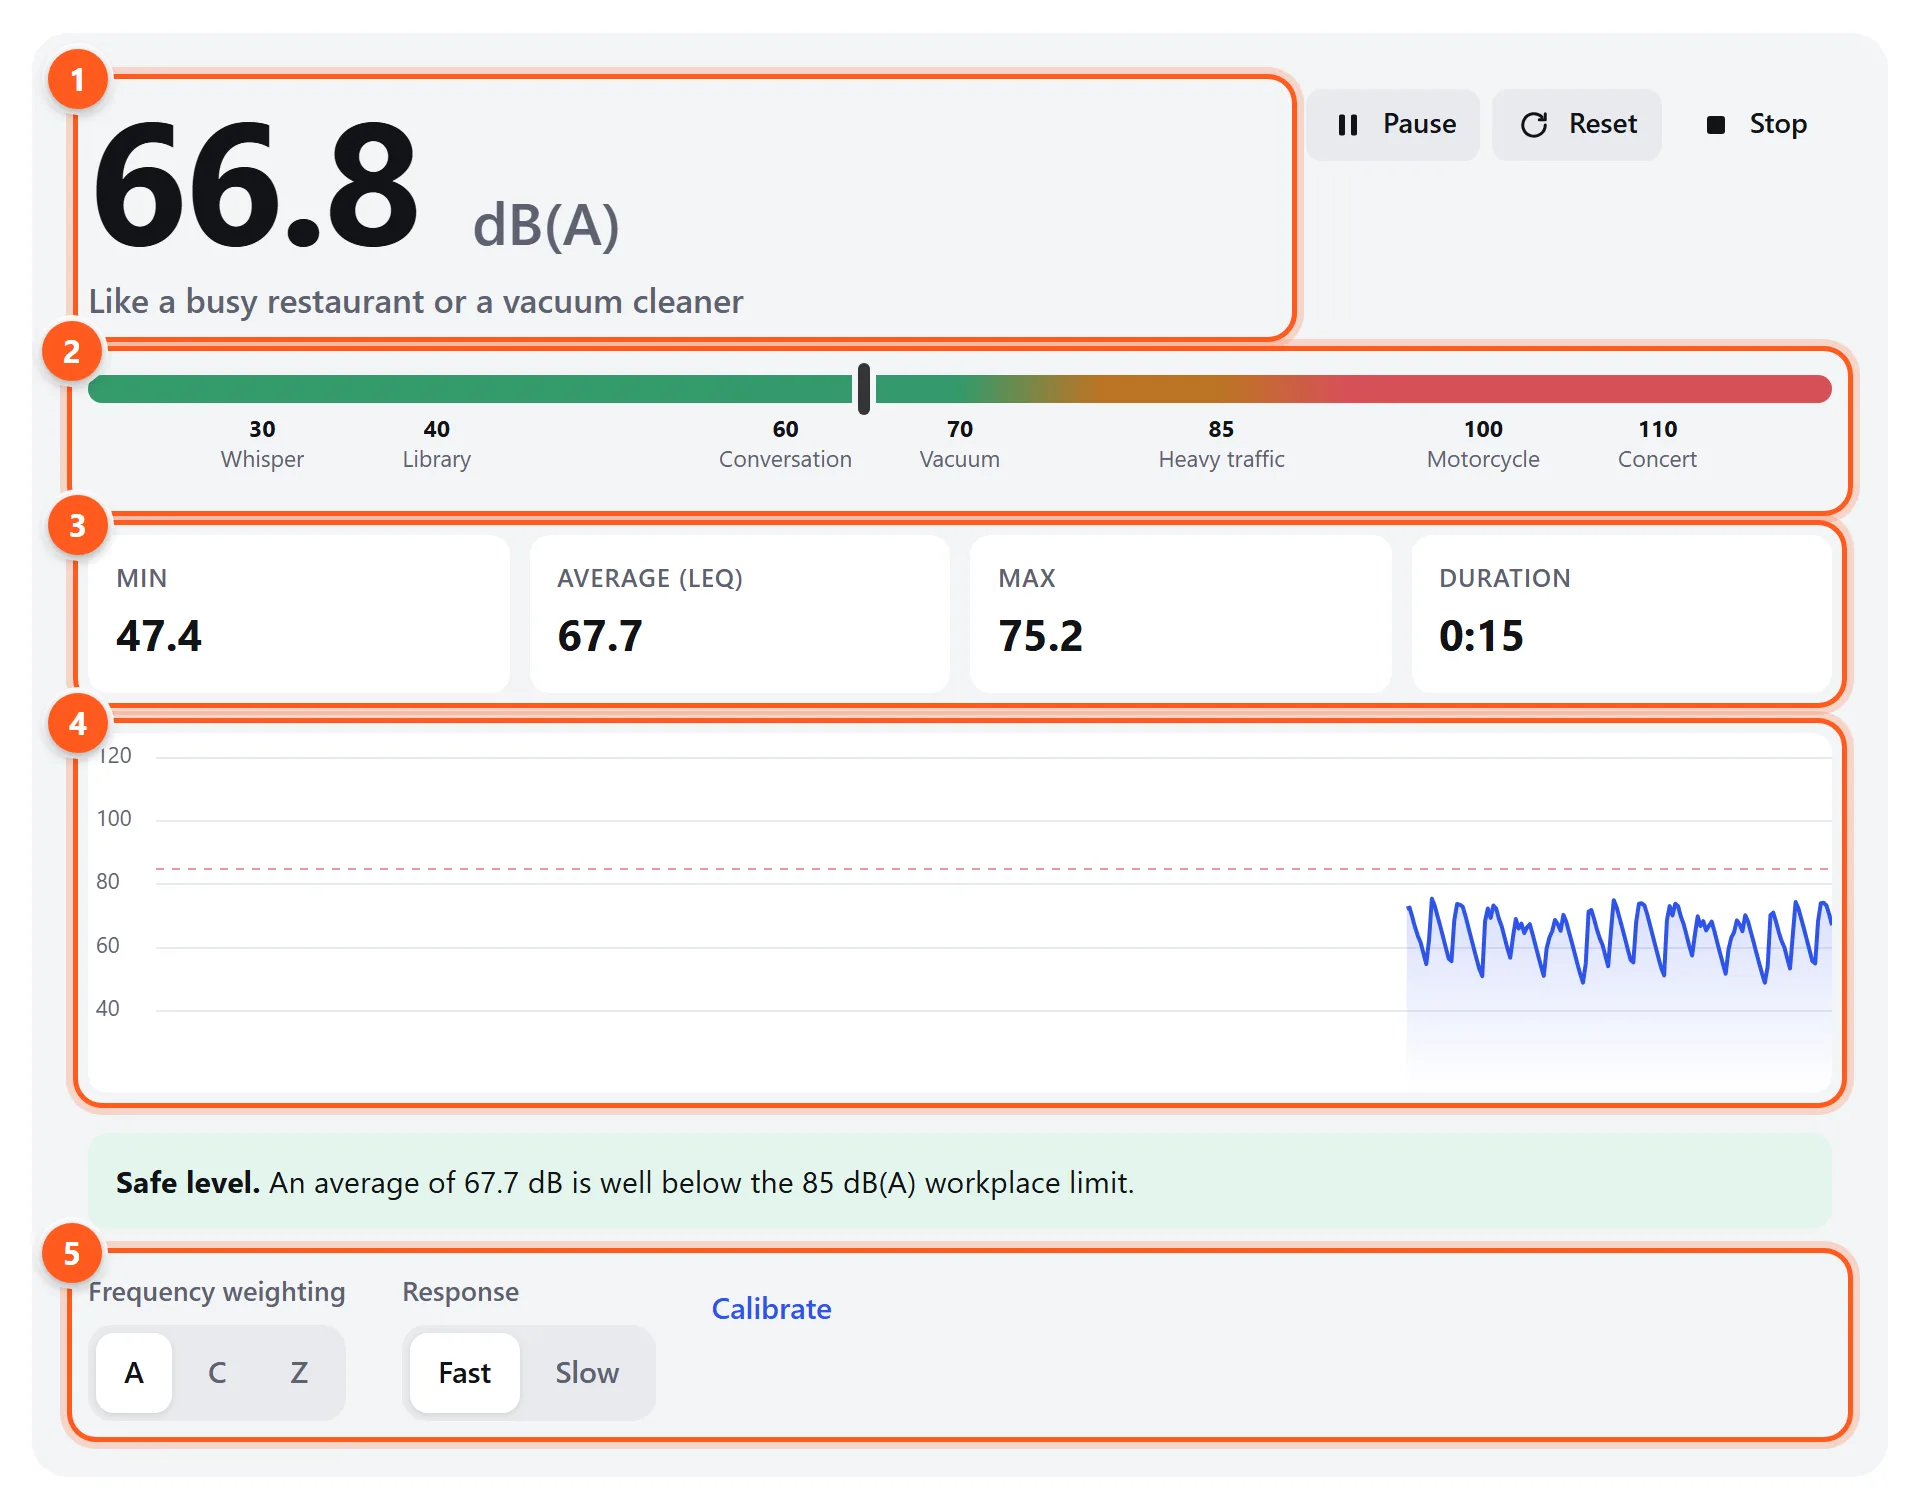
- Live level with a plain-language comparison, such as “Like a normal conversation”.
- Reference scale: green is comfortable, orange is loud, red risks hearing damage with prolonged exposure.
- Minimum, energy-averaged (Leq) and maximum level since you started or last reset.
- The last 60 seconds. The dashed red line marks 85 dB, the workplace hearing-protection threshold.
- Weighting, response speed and calibration settings.
Decibel levels of common sounds
| Level | Typical sound | Effect |
|---|---|---|
| 0 dB(A) | Threshold of hearing | The quietest sound a young, healthy ear can detect |
| 20–30 dB(A) | Rustling leaves, quiet bedroom at night, whisper | Very quiet |
| 40 dB(A) | Library, quiet residential area | Quiet |
| 50 dB(A) | Moderate rainfall, quiet office, refrigerator hum | Comfortable |
| 60 dB(A) | Normal conversation at 1 m, background music | Comfortable |
| 70 dB(A) | Vacuum cleaner, busy restaurant, shower | Noticeably loud, but safe |
| 80 dB(A) | Busy road, alarm clock up close, garbage disposal | Loud. Hearing risk after many hours |
| 85 dB(A) | Heavy city traffic, food blender, noisy factory | Workplace limit: about 8 hours a day |
| 90–95 dB(A) | Lawn mower, motorcycle at 8 m, subway train | Hearing risk within 1–2 hours |
| 100 dB(A) | Hand drill, nightclub, headphones at maximum | Risk within 15 minutes |
| 110 dB(A) | Rock concert, chainsaw, car horn up close | Risk within 1–2 minutes |
| 120+ dB(A) | Thunderclap, ambulance siren up close | Painful. Immediate risk of damage |
How loud is too loud?
Hearing damage depends on both level and time. The US National Institute for Occupational Safety and Health (NIOSH) sets the recommended limit at 85 dB(A) averaged over 8 hours. Every 3 dB above that halves the safe time, because +3 dB means twice the sound energy:
| Average level | Maximum daily exposure (NIOSH) |
|---|---|
| 85 dB(A) | 8 hours |
| 88 dB(A) | 4 hours |
| 91 dB(A) | 2 hours |
| 94 dB(A) | 1 hour |
| 97 dB(A) | 30 minutes |
| 100 dB(A) | 15 minutes |
| 103 dB(A) | 7.5 minutes |
| 106 dB(A) | under 4 minutes |
| 110 dB(A) | about 1.5 minutes |
For music through headphones, the World Health Organization’s safe-listening guidance is about 80 dB(A) for 40 hours a week for adults (75 dB(A) for children). For sleep, it recommends bedroom noise around 30 dB(A). If you regularly measure above 85 dB at work or at events, use earplugs and check your hearing with the hearing test.
Understanding the settings
A, C and Z weighting
Your ears are less sensitive to deep bass and very high frequencies, especially at moderate levels. A-weighting applies the same curve, so it best reflects how loud something seems and how harmful it is. Use it for almost everything. C-weighting is nearly flat and includes bass, so use it for loud music or to catch low rumble that A-weighting hides. A large gap between the C and A readings means the noise is mostly bass. Z is unweighted.
Fast and slow response
Fast (125 ms) follows quick changes such as speech and clatter. Slow (1 second) smooths the reading, which makes fluctuating noise like traffic easier to read by eye. The Leq average is the same with either setting.
Why decibels are logarithmic
Decibels are a logarithmic scale. +3 dB is twice the sound energy, and +10 dB is ten times the energy, which most people hear as roughly “twice as loud”. That’s why 90 dB is far more dangerous than 80 dB, not slightly worse.
Accuracy and how to calibrate
Built-in microphones aren’t measurement instruments. Their sensitivity varies between models, many roll off below about 100 Hz, and phones may overload above roughly 100–115 dB. The default setting maps a typical microphone to approximate dB SPL. Treat absolute readings as estimates (±5–10 dB) and differences on the same device as reliable.
To calibrate, you need a reference: a real sound level meter, or a trusted meter app on a device that is already calibrated.
- Play steady noise at a moderate level. The pink noise generator works well. Place both microphones side by side, about 1 m from the speaker.
- Set this meter to the same weighting as the reference (usually A), and to Slow.
- Open Calibrate, type the reference reading and click Match this reading. The offset is saved in this browser for next time.
- Check at a second, louder level. If the two meters still agree within 2 dB, you’re done.
Tips for measuring correctly
- Hold the device still, at arm’s length, and keep it away from your body. Handling noise and wind across the microphone produce false peaks.
- On a laptop, the fan and keyboard sit right next to the microphone. A USB mic or headset gives cleaner readings.
- Use a wired or built-in microphone. Bluetooth headsets apply their own processing, so their readings aren’t meaningful.
- Measure at the place you care about, such as your pillow for a bedroom noise problem, not right next to the source.
- To find what makes a noise, for example hum or a single frequency, look at it with the spectrum analyzer.