How to use the subwoofer test
Each tab is a separate test. Work through them in order the first time you set up a sub:
- Tones: play 40 Hz to confirm the sub is working, then step down to see how low it goes. Turn on Pulse if room noise makes a steady hum hard to judge.
- Rattle hunt: a slow sweep from 15 to 120 Hz. Mark each frequency where something buzzes, then hold that tone while you find the source.
- Crossover: choose your crossover frequency. The tool sweeps up and down around it. The loudness should stay even as it passes the red mark.
- Phase: play the crossover frequency while someone flips the sub’s phase switch. Keep the louder setting.
- Kick: a kick drum loop to judge punch and tightness on something that sounds like music.
- Room response: measures 20 tones with your microphone and draws your room’s bass curve. Measure, move the sub, and measure again to compare.
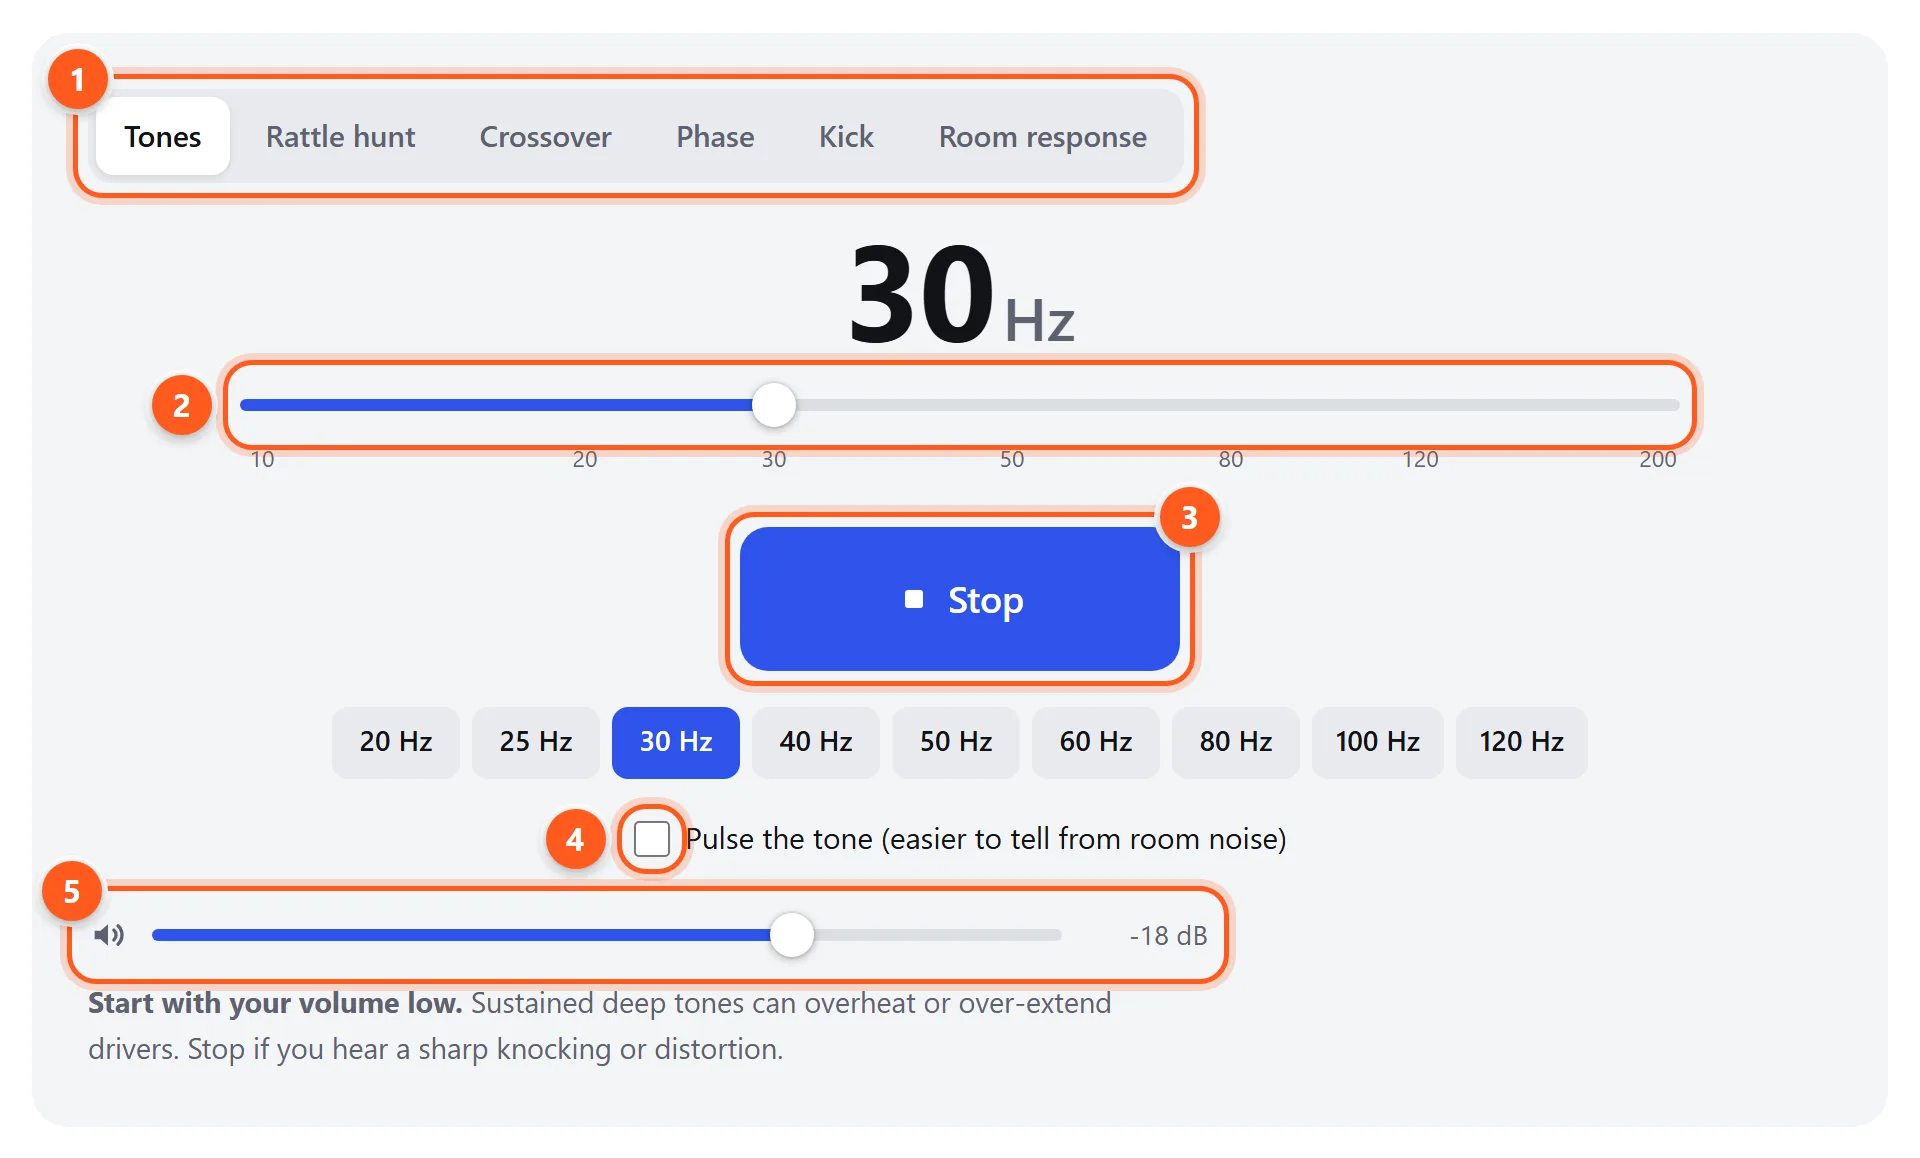
- Pick a test. Audio stops when you switch tabs.
- Drag through 10–200 Hz, or tap a preset.
- Play or stop. Space works too.
- Pulsing makes the tone easier to pick out from room noise and helps with auto-on subwoofers.
- Output level. Start low and use your amplifier for most of the volume.
Is my subwoofer working? A quick checklist
Play at a moderate volume. If you hear and feel nothing from the sub, check these in order:
- Power and standby. Is the power LED on? Most subs have an Auto standby mode that wakes up when it detects a signal. That can take a few seconds, and quiet signals may not wake it. Switch it to On while testing.
- The sub’s own controls. Set the gain/volume knob to about halfway. If you connect through an AV receiver’s LFE output, set the sub’s low-pass knob to its maximum or “LFE/bypass” so it doesn’t filter on top of the receiver’s crossover.
- The cable and input. With a receiver, use the receiver’s SUB/LFE PRE OUT to the sub’s LFE or LINE IN (left input if there’s a pair). Try a different RCA cable. A faulty cable is the most common cause of a dead sub.
- Receiver settings. In the speaker setup menu, set Subwoofer: Yes and your main speakers to Small. If the speakers are set to Large with no “LFE + Main” option, stereo music sends no bass to the sub.
- Wireless subs (soundbars, Sonos-type systems) lose their pairing. Re-pair using the button on the back of the sub.
How this page reaches your sub: your browser plays stereo, so the sub plays these tones only through bass management in your receiver or soundbar, or through the sub’s own crossover if it’s connected with speaker-level or line inputs. That’s the same path music takes, so it’s a realistic test. To send a test signal directly to the LFE channel, use multichannel mode in the surround sound test.
Subwoofer frequency range
Most home subwoofers are designed for roughly 20–120 Hz. Typical limits:
| Subwoofer | Typical lowest frequency (−3 dB) | Listen |
|---|---|---|
| Small soundbar sub (6–8") | 35–45 Hz | |
| 10" home theater sub | 25–35 Hz | |
| 12" sub | 20–28 Hz | |
| Large or dual 15" subs | 15–20 Hz and below |
Below its limit, a sub doesn’t go silent all at once. Output fades steadily, and ported subs often “chuff” or knock if you push them below their port tuning. Your hearing is also far less sensitive down there, so a tone that seems faint can be quite loud in reality.
Placement: the subwoofer crawl
Where you put the sub matters more than which sub you buy. Your room creates standing waves (room modes): at some frequencies the bass piles up into a boom, and at others it nearly cancels. Both depend on where the sub and your seat are.
- Put the subwoofer temporarily on your listening seat, roughly at ear height.
- Start the Crossover sweep, or play a song with a steady, walking bassline.
- Crawl around the floor along the walls where the sub could realistically go, with your head near floor level.
- Where the bass sounds smoothest and most even (no notes booming, none vanishing), mark that spot.
- Put the sub there, go back to your seat, and confirm with the Room response measurement.
This works because sound paths are reversible: how the sub sounds at your seat from a given spot is how your seat sounds from that spot. A corner gives the most output but usually the most uneven response. Using two subs, on opposite walls or in the middle of the front and rear walls, smooths room modes dramatically.
Reading the room response chart
The Room response tab plays 20 tones in 1/6-octave steps and measures how loud each one is at your microphone. The curve is centered on its median level, so 0 dB is “average” for your system.
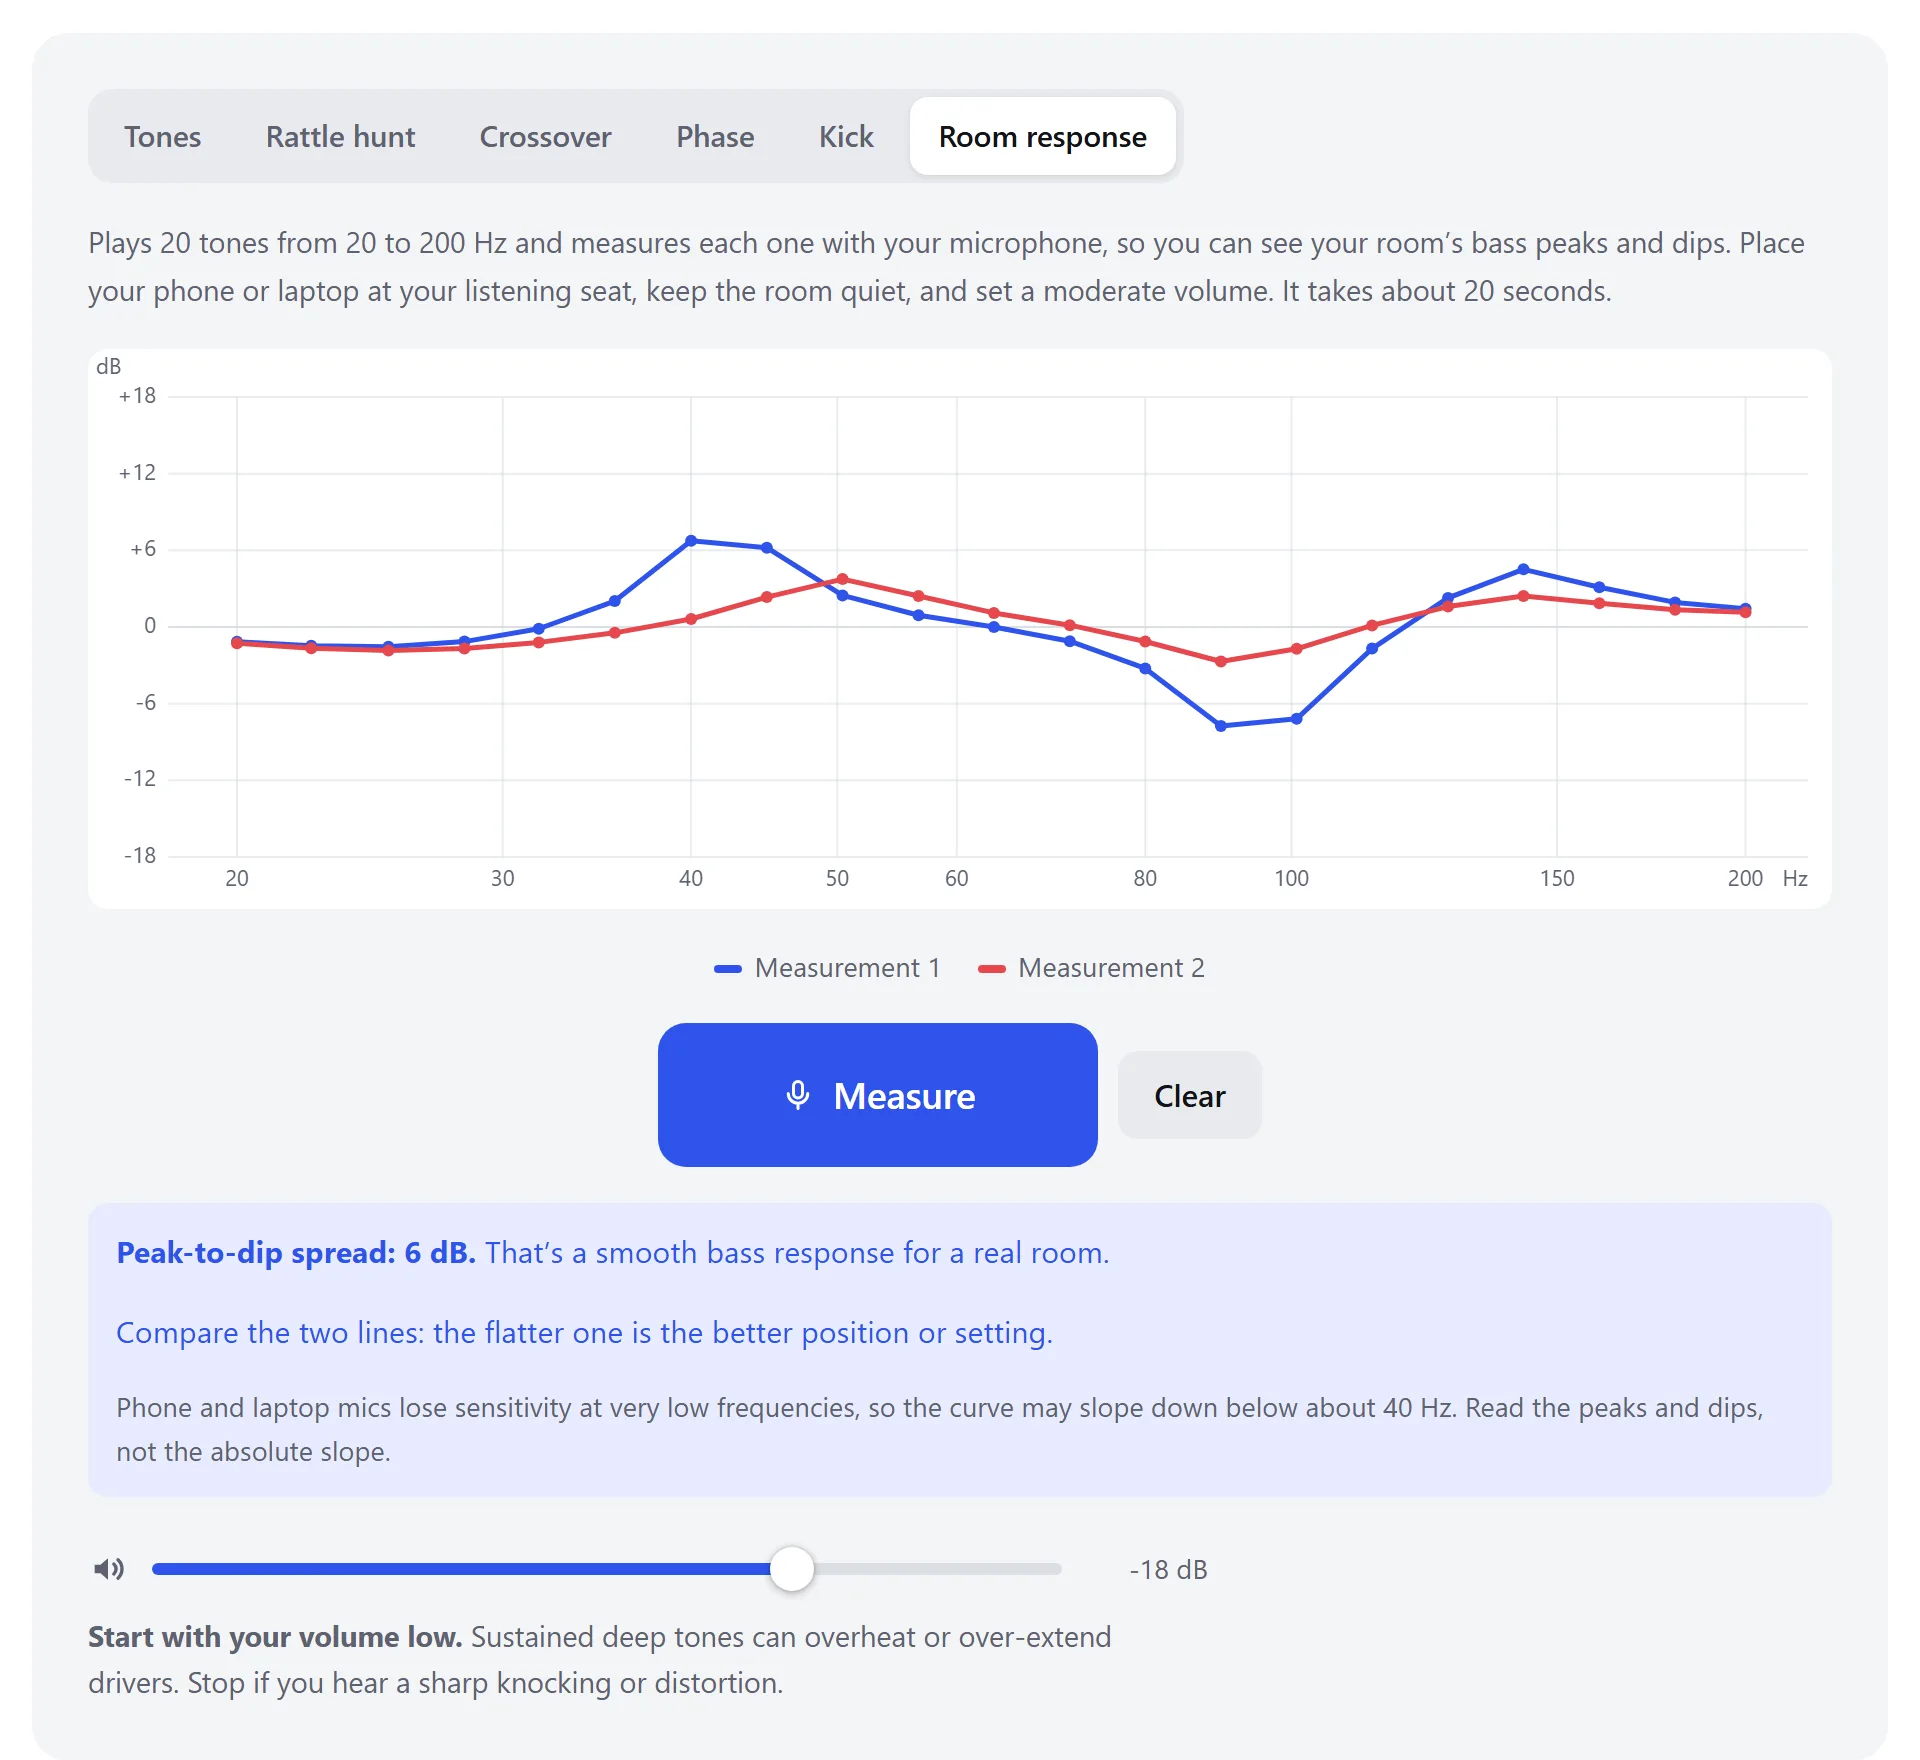
- Peaks of +6 dB or more are usually room modes. Notes at that frequency boom and hang on. Fix them by moving the sub or the seat, or with EQ and room correction (Audyssey, Dirac, YPAO, ARC, or a sub with built-in parametric EQ). Cutting peaks with EQ works well.
- Deep dips of −8 dB or more are cancellations. Boosting them with EQ wastes amplifier power and rarely helps, because more output just cancels too. Move the sub, flip the phase, or move your seat instead.
- Compare two measurements: measure, change one thing (sub position, phase, crossover), and measure again. The second run is drawn in red on the same scale.
Phone, tablet and laptop microphones are less sensitive to deep bass, so the curve may slope down below 30–40 Hz even if your sub is fine. The useful information is the peaks and dips, and the difference between two measurements. For accurate absolute measurements, use a calibrated USB measurement mic. Hold the device still, and keep it in the same place for both measurements.
Setting crossover, phase and level
Crossover
The crossover is the frequency where bass hands over from your main speakers to the sub. 80 Hz is the standard starting point. Small satellite speakers need 100–120 Hz. Set it in your receiver’s speaker menu, not on the sub, if you have a receiver. Then run the Crossover sweep. A clear dip near the red mark means the sub and speakers are partly canceling there: try the phase next. A bump means they overlap too much: lower the crossover or the sub level slightly.
Phase
Sound from the sub and from your speakers travels different distances to your ears. At the crossover frequency both are playing, and if their waves arrive out of step, they cancel. Play (or your crossover frequency) in the Phase tab and switch between 0° and 180°. The louder setting is correct. Receivers with a distance or delay setting for the sub do the same job, so measure the actual distances and enter them.
Level
The most common mistake is setting the sub too loud. It sounds impressive for a day, then boomy and fatiguing. Match the sub to your speakers with the receiver’s test noise and the decibel meter (the same reading from each speaker and the sub). Then, to taste, turn the sub up by no more than 2–4 dB.
Finding and fixing rattles
Low frequencies make anything loose vibrate: picture frames, window panes, shelves, the sub’s own grille, even screws inside the cabinet. Use Rattle hunt at a moderate level and mark each frequency that buzzes. Then tap a mark to hold that tone and walk around the room to find the source. Typical fixes are felt pads, Blu-Tack, or tightening the screws. If the rattle comes from the subwoofer itself, try removing the grille. If it persists, the driver surround may be damaged.