How to test your microphone
- Click “Test my microphone”. Your browser asks for permission. Choose Allow. If no prompt appears, access may already be blocked: see how to unblock it.
- Speak at a normal volume. The meter and waveform should move with your voice, and the status turns green with “We hear you!”.
- Check the level. When you talk normally, the meter should mostly be in the green and peak around −20 to −6 dB. The checks panel tells you if it’s too quiet, too loud or noisy.
- Record and play back. Click Record, say a sentence, then Stop and Play. This is the best way to hear echo, hum, muffled sound or distortion.
- Try other microphones and settings. Switch microphones from the list. You don’t need to reload. Toggle voice processing to hear what your calls will sound like with and without it.
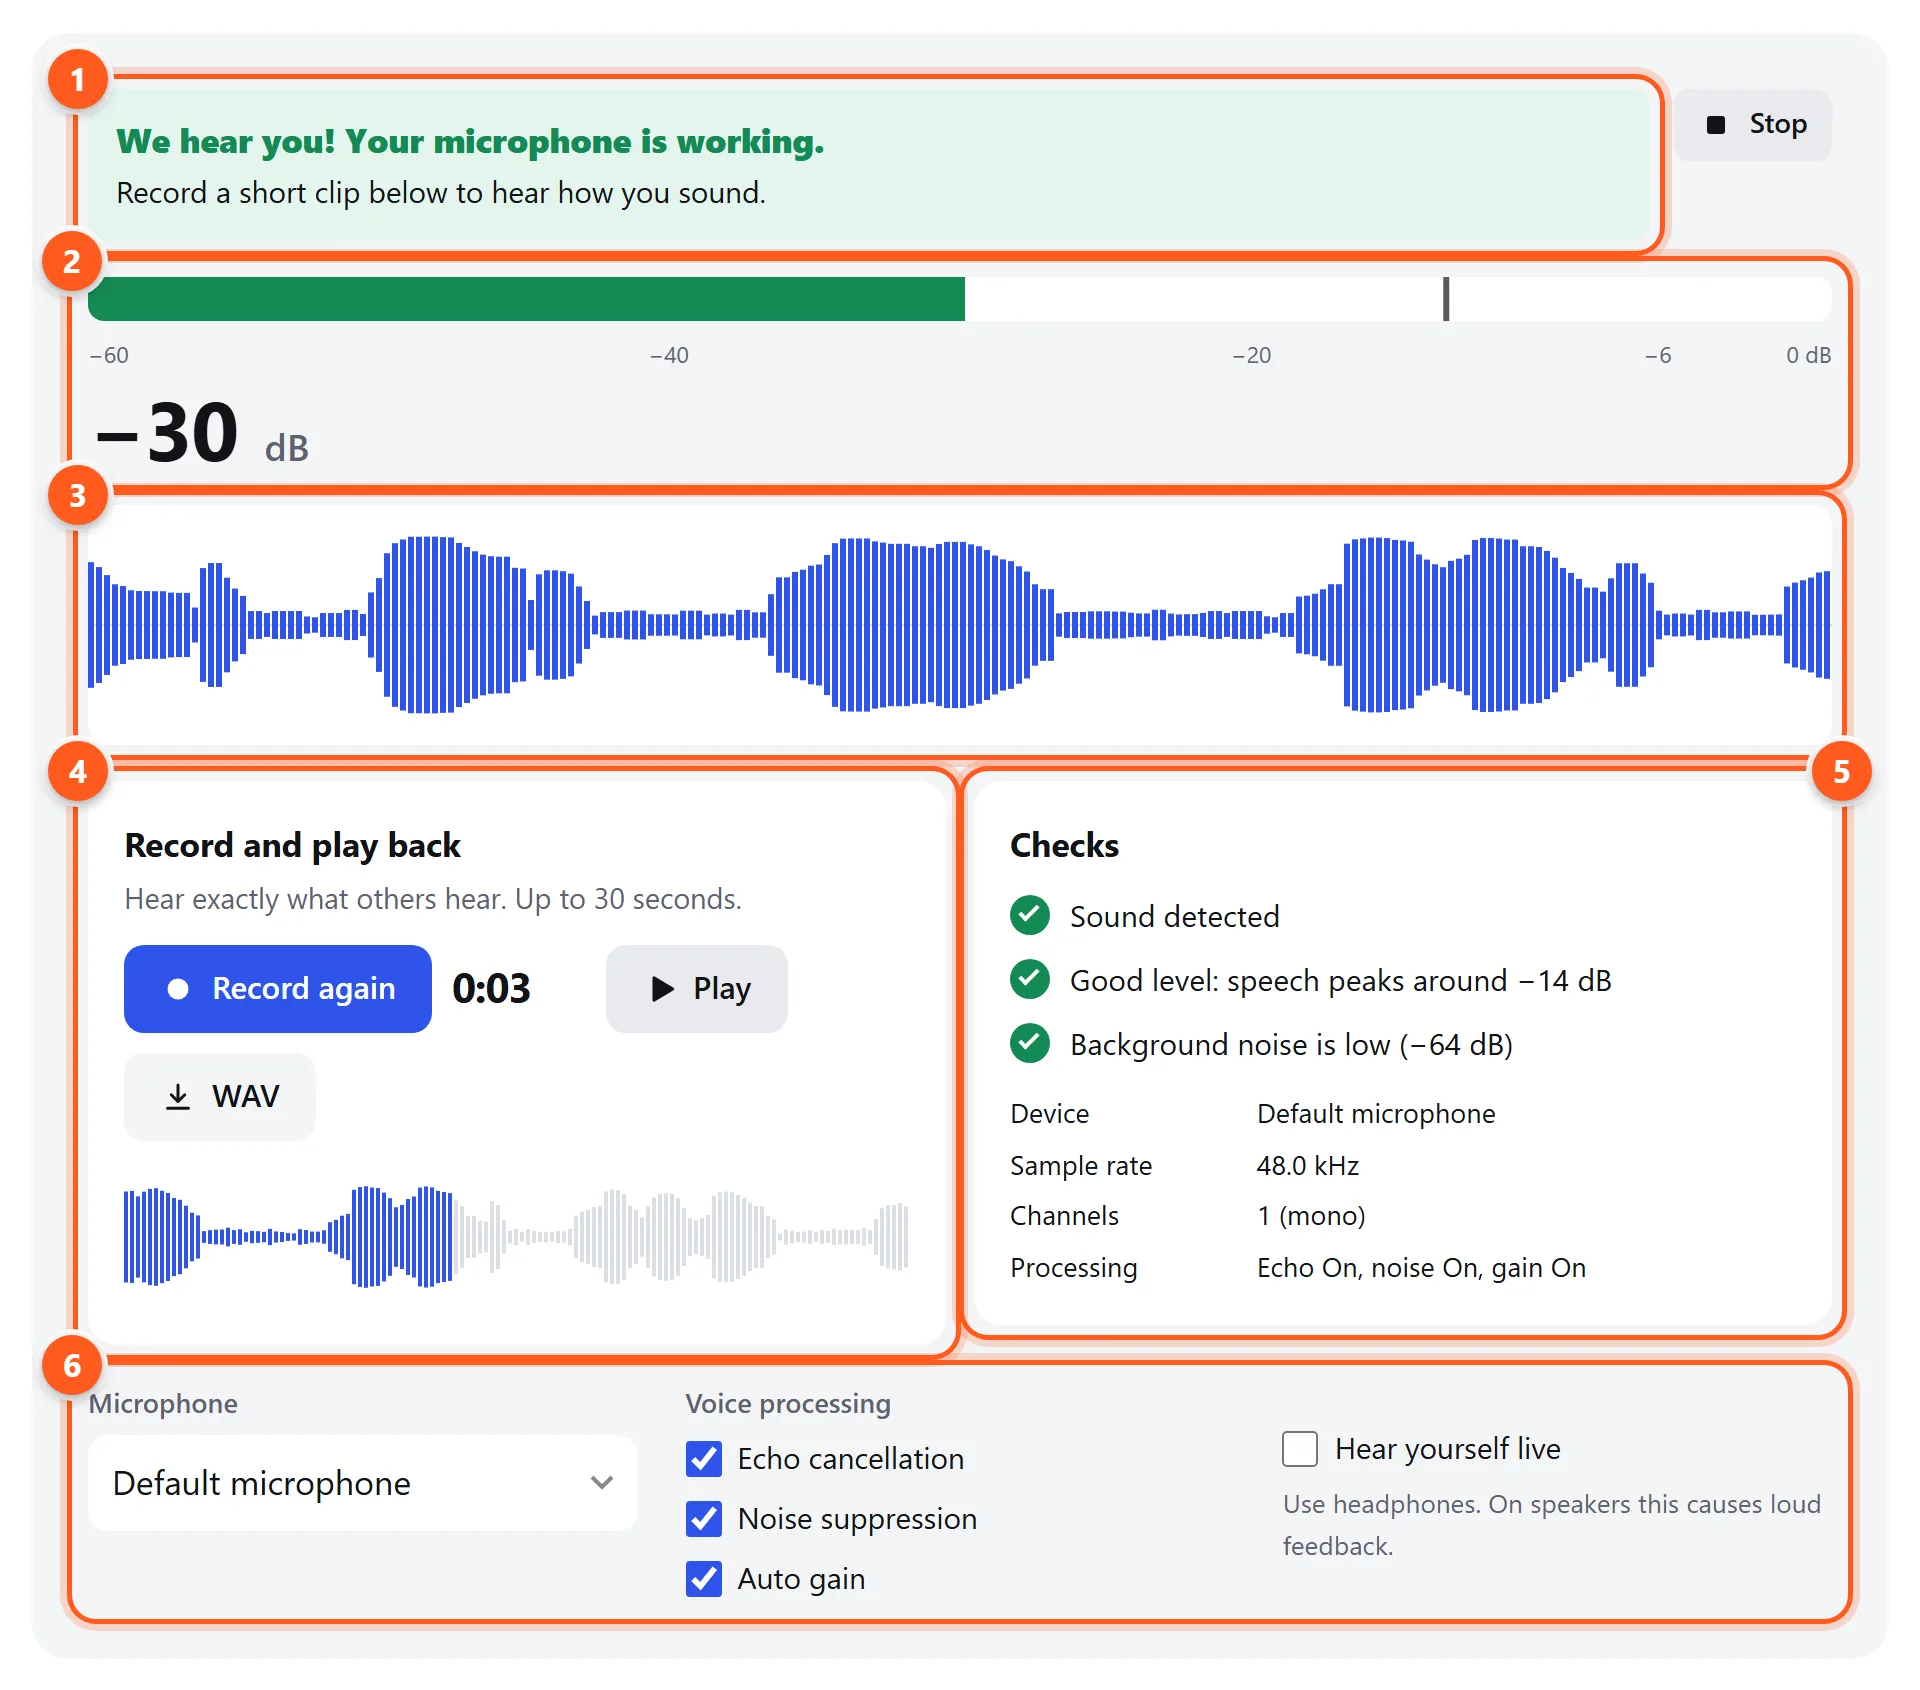
- Status: tells you in plain words whether your mic works and what to fix.
- Level meter: the bar shows your current level and the thin line holds the latest peak. Aim for speech peaks between −20 and −6 dB.
- Live waveform of the last few seconds. Bars turn red if the signal clips.
- Record up to 30 seconds, play it back, click the waveform to jump, or download it as a WAV file.
- Automatic checks for signal, level and background noise, plus details of your device.
- Switch microphones and turn voice processing on or off. The change applies immediately.
What the results mean
| Meter while you speak | Meaning | What to do |
|---|---|---|
| Doesn’t move at all (−∞) | The mic sends pure silence: it’s muted, switched off, or the wrong device is selected | Check mute buttons and switches, then choose another device from the list |
| Below about −40 dB | Too quiet. Others will struggle to hear you, or the app will boost the noise too | Move closer and raise the input volume or gain |
| Peaks around −20 to −6 dB | Ideal level for speech | Nothing to change |
| Peaks above −3 dB, red CLIP light | Too loud. Your voice distorts | Lower the input gain, or move back a little |
The background noise check measures the level in the quiet moments between words. Below −60 dB is very clean. Between −60 and −45 dB is normal for a laptop in a home office. Above −40 dB, people will hear fans, traffic or electrical hum. Find out what the noise is with the spectrum analyzer: hum shows up as a sharp peak at 50 or 60 Hz.
Voice processing: why your mic sounds different in each app
Browsers and call apps clean up your voice before sending it. You can switch each step on or off above, then record and compare:
- Echo cancellation removes the sound of your own speakers from your mic, so the other person doesn’t hear themselves. With headphones you don’t need it.
- Noise suppression removes steady background noise such as fans and hum. When it’s too aggressive, voices sound watery or words get cut off.
- Auto gain raises or lowers your level automatically. It can make a quiet mic usable, but it also pumps background noise up during pauses.
With all three off, you hear the raw microphone, which tells you the true quality of the hardware. With them on, you hear roughly what Google Meet and most browser-based call apps send.
Microphone not working? Allow it in your browser
If you clicked Block once, the browser remembers and stops asking. Here’s how to undo it:
- Chrome: click the tune icon at the left of the address bar → turn Microphone on. Or go to Settings → Privacy and security → Site settings → Microphone and remove soundtester.dev from Not allowed. Reload the page.
- Edge: click the lock icon → Permissions for this site → Microphone → Allow. Reload.
- Firefox: click the crossed-out microphone icon in the address bar and clear the blocked permission, then reload and choose Allow.
- Safari (Mac): Safari → Settings for soundtester.dev → Microphone → Allow.
- iPhone/iPad: tap aA in the address bar → Website Settings → Microphone → Allow. Or open Settings → Apps → Safari → Microphone.
- Android: in Chrome tap the tune icon → Permissions → Microphone → Allow. If Chrome itself is blocked, open Settings → Apps → Chrome → Permissions → Microphone.
Fix a microphone that isn’t working on Windows 11 or 10
- Privacy settings. Settings → Privacy & security → Microphone. Turn on Microphone access, Let apps access your microphone and Let desktop apps access your microphone. Browsers count as desktop apps.
- Choose the right input. Settings → System → Sound → under Input, select your microphone. Speak and watch the level bar there.
- Raise the input volume. Click your microphone in that list and set Input volume to 70–100. Some USB mics also have a hardware gain knob.
- Check that it isn’t disabled. Settings → System → Sound → More sound settings → Recording tab. Right-click empty space and tick Show disabled devices, then enable your mic.
- Release exclusive mode. In that Recording tab, open the mic’s Properties → Advanced and untick Allow applications to take exclusive control. Otherwise one app can lock the mic away from everything else.
- Reinstall the driver. Right-click Start → Device Manager → Audio inputs and outputs → right-click your mic → Uninstall device, then restart. Windows reinstalls it automatically. For a front-panel jack, check jack detection in the Realtek Audio Console.
Fix a microphone on a Mac
- System Settings → Privacy & Security → Microphone, and switch on your browser (and Zoom, Teams or Discord if needed). Quit and reopen the app after changing this.
- System Settings → Sound → Input: select your microphone and drag Input volume to about three quarters. The level bar there should move when you speak.
- With AirPods connected, macOS often switches the input to the AirPods. Pick the built-in or USB microphone if you want that one instead.
Check the hardware
- Mute switches: many headsets have a mute button on the cable or a flip-up boom that mutes when raised. Gaming headsets often show a red light when muted.
- 3.5 mm jacks: a headset with a single 4-pole (TRRS) plug needs a combined headset jack. Laptops have one, but desktop PCs usually have separate pink mic and green headphone jacks, so you need a splitter adapter.
- USB microphones: try a different port, ideally directly on the computer rather than through a hub.
- XLR microphones: these need an audio interface or mixer. Condenser mics also need 48V phantom power switched on, and the interface’s gain knob turned up.
Microphone types at a glance
| Type | Typical sound | Common problems |
|---|---|---|
| Laptop / webcam built-in | Thin, picks up the room and keyboard | Echo and room noise. Sit closer, or use a headset |
| Bluetooth headset or earbuds | Muffled, “phone-like” | Switches to low-quality hands-free mode during calls |
| Wired headset (3.5 mm / USB) | Clear, close to the mouth | Wrong jack type, mute switch on the cable |
| USB desktop mic | Full and detailed | Gain set too high (clipping), picks up keyboard |
| XLR mic + interface | Best quality and control | Gain at zero, phantom power off for condenser mics |
Testing in Zoom, Teams, Discord and Google Meet
- Zoom: Settings → Audio → choose the microphone, then Test Mic. If your level keeps drifting, untick Automatically adjust microphone volume.
- Microsoft Teams: Settings → Devices → choose the microphone, then Make a test call.
- Discord: User Settings → Voice & Video → set Input Device, and use Let’s Check. If people hear you cut in and out, lower the input sensitivity or switch to Push to Talk.
- Google Meet: click the three dots → Settings → Audio, and pick the microphone. Meet runs in the browser, so if it works here, it will work there.
How to sound better
- Keep the mic 10–20 cm (4–8 in) from your mouth, slightly to the side, so breaths and “p” sounds don’t pop.
- Set the gain so normal speech peaks around −12 dB. That leaves room for laughing or raised voices without clipping.
- Soft furnishings reduce echo. A small room with a bed, curtains or bookshelves sounds far better than an empty kitchen.
- Use headphones on calls so echo cancellation doesn’t have to fight your speakers.